Abstract
This document outlines the calibration procedures for various laboratory equipment essential for accurate and reliable measurements in scientific studies. Specifically, it details the calibration of volumetric flasks, measuring cylinders, graduated pipettes, and pH meters. The procedures involve meticulous steps to ensure adherence to tolerance limits and maintain the quality of data generated in laboratory settings.
Keywords
Calibration, Laboratory equipment, Standardization, Laboratory Skills, PH Meter, glassware calibration.
Introduction
Accurate measurement is fundamental to scientific research, particularly in safety studies and quality assurance programs. Calibration of laboratory equipment is a critical aspect of ensuring the reliability and validity of experimental data. This document presents detailed procedures for the calibration of volumetric flasks, measuring cylinders, graduated pipettes, and pH meters. By following these procedures, laboratories can maintain traceability, reliability, and compliance with quality standards. Effective calibration practices contribute to the overall integrity and reproducibility of scientific research, supporting advancements in various fields.
Basic Laboratory Skills:
Good Laboratory Practice is based on four principles:
- The Management; the Quality Assurance; the Study Director; and the National Compliance Monitoring Authority. All of them serve important functions in the
- Concordance of performing and monitoring safety studies, and it should be kept in mind that all of them are required for GLP to achieve quality data.
- Although GLP differs from other quality systems in aspects that are important not only for the traceability of data but especially for the full reconstruct ability of the study, there are certain co-occurrences between GLP and other quality systems like accreditation schemes. [1,13]
The concerns of the chapter may be summarized as follows:
- Test facility management
- Quality assurance programme
- Meeting the requirements of the test facility
- Equipment
- Receipt, handling, sampling and storage
- Standard operating procedures.
- Performance of the study.
- Reporting of study results
- Storage and retention of records and materials.
Calibration of glassware’s
Glassware is commonly calibrated using a liquid of known, specific density, and an analytical balance. The procedure is to determine the mass of liquid the glassware will hold, and to divide the is mass of liquid by the density of the liquid, obtaining the corresponding volume of liquid. [2,4,14]
Calibration procedure of volumetric flask [3,15]
- Before calibration, clean and dry the flask to be calibrated. 2. Weigh the empty flask and record the accurate weight of flask.
- Take distilled water at room temperature and ensure that water attains temperature equilibrium with room temperature by keeping at room temperature for half an hour.
- Note the room temperature and the temperature of water with calibrated thermometer.
- Fill the flask with distilled water up to the calibration mark, taking care that no water droplets remain on the neck of the flask or above the calibration mark.
- Weigh the filled flask and record the weight, Subtract the empty weight of volumetric flask and record the weight.
- Convert the weight of water at room temperature into volume of water at 27°C.
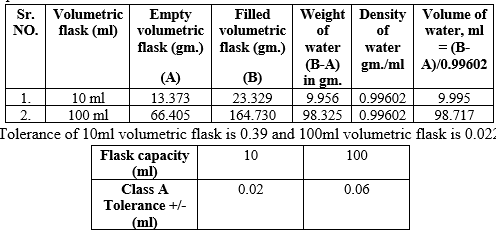
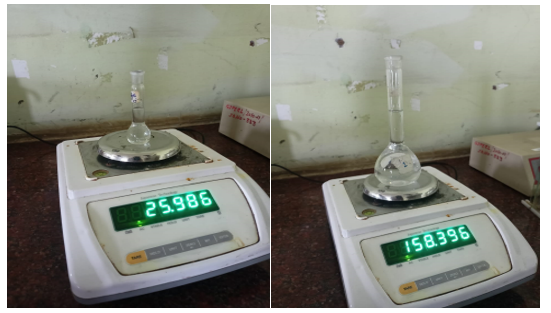
Fig 1. Measurement of the volumetric flask
Result: The following glassware’s were calibrated.
Conclusion: The calibrations of glassware’s are achieved and it is concluded that it is in compliance with 100ml volumetric flask & non-compliance with 10ml volumetric flask with the tolerance limit.
Calibration of measuring cylinders [5]
- Before calibration, clean and dry the measuring cylinders to be calibrated.
- Weigh the empty measuring cylinder under calibration and record the accurate weight of measuring cylinders.
- Take distilled water at room temperature and ensure that water attains temperature equilibrium with room temperature by keeping at room temperature for half an hour. Note the room temperature and the temperature of water with calibrated thermometer.
- Fill the measuring cylinders with distilled water up to the calibration mark, taking care that no water droplets remain on the neck of the measuring cylinders or above the calibration mark.
- Weigh the filled measuring cylinders and record the weight, subtract the empty weight of measuring cylinders and record the weight. 6. Convert the weight of water at room temperature into volume of water at 27°C.
Measuring cylinder (100 ml) empty weight (A) is 133.482
Measuring cylinder (100 ml) filled weight (B) is 233.986
Measuring cylinder (10 ml) empty weight (C) is 29.14
Measuring cylinder (10 ml) filled weight (D) is 39.040
Calculation of tolerance: for 100ml; 233.986 (B) -133.482 (A) = 100.504ml
TOLARANCE = 100 - 100.504 = 0.504 ml
Calculation of tolerance: for 10ml 39.040(D) - 29.14 (C) = 9.9ml
TOLARANCE = 10 – 9.9 =0.1

Tolerance of 10ml measuring cylinder is 0.1 and 100ml measuring cylinder is 0.504.
Result:
The following glassware’s were calibrated.
Conclusion: The calibrations of glassware’s are achieved and it is concluded that it is in compliance with 100ml measuring cylinder & 10ml measuring cylinder with the tolerance limit.
Calibration of graduated pipettes [6,7]
- Before calibration, clean and dry the pipette to be calibrated.
- Weigh a clean, dry beaker of suitable capacity i.e. in accordance with the capacity of pipette to be calibrated and record its weight.
- Fill the pipette under calibration by suction of distilled water, having temperature equilibrium with the room temperature, up to the level of 2-3 cm above the graduation line. Note the room temperature and the temperature of water with calibrated thermometer.
- Wipe the outside of delivery jet of pipette with tissue paper. Hold the pipette in vertical position and allow draining the water until the base of the meniscus is set accurately against the graduation mark.
- Allow the water to flow down slowly in tarred receiving vessel, until graduation line to be tested reaches.
- Weigh the receiver with water collected in it. Convert the weight of water at room temperature into volume of water at 27°C.
Weight of empty beaker (A) = 49.967 gm.
Weight of beaker + Distilled water in 5 ml pipette (B) = 55.033 gm.
Weigh of beaker + Distilled water in 10 ml pipette (C) = 59.985 gm.
Weight of distilled water in 5 ml pipette (B-A) = 5.066 gm.
Weight of distilled water in 10 ml pipette (C-A) = 10.018 gm.

Tolerance of 5ml pipette is -0.066 and 10ml pipette is -0.018.
Result:
The following glassware’s were calibrated.
Conclusion The calibrations of glassware’s are achieved and it is concluded that 5ml pipette is non-compliance with tolerance limit and in compliance the 10ml pipette with tolerance limit.
Calibration of analytical instruments:
Preparation of calibration [8,16]
Step1
Turn on your pH meter. Before you begin to calibrate and use your pH meter you will first need to turn it on and allow adequate time for the meter to warm up. This should generally take around 30 minutes, but check your pH meter's operating manual for exact times.
Step 2
Clean your electrode. Take the electrode out of its storage solution and rinse it with distilled water under an empty waste beaker. Once rinsed, blot dry with Kim wipes or Shur wipes, which are available at most office supply stores.
- Be sure to rinse your electrode in a waste beaker that is different from the beaker you will be calibrating in.
- Avoid rubbing the electrode as it has a sensitive membrane around it.
- If you find the electrode to be particularly dirty consult your operating manual for recommended cleaning solutions.
Step 3
Preparation of buffers. You will generally need more than one buffer for calibrating a pH meter. The first will be a “neutral” buffer with a pH of 7, and the second should be near the expected sample pH, either a pH of 4 or 9.2 Buffers with a higher pH are best for measuring bases, whereas buffers with a low pH are best for measuring acidic samples. Once you have chosen your buffers allow them to reach the same temperature as the pH meter because pH readings are temperature dependent. Pour your buffers into individual beakers for calibration.
- Check with your pH meter manufacturer, or current educational or professional institution, about acquiring pH buffer solutions.
- Buffers should be kept in a beaker for no longer than two hours.
- Discard the buffer when you are finished. Do not return it to its original container. [9]
Calibrating pH Meter
To calibrate a pH meter you will need two types of buffer solutions: pH7 and pH4. These buffer solutions help you with displaying the right pH values, because when you use a pH meter you want to be sure that the pH meter displays the right measurement. You use the buffer solutions with known pH, so you can adjust the meter. First start with pH9.2 buffer solution and then pH7 buffer solution then pH4. However, make sure to use fresh buffer solution for each pH meter calibration. You can calibrate the ph meter as follows:
- First place the electrode in the pH9.2 solutions. After approximately 1 minute the measurement will be stable. The meter should indicate a Ph value of 9.2. If this is not the case, then establish the ph meter at these value
- Rinse the electrode well with demineralized water and then place the electrode in the pH 7 buffer solution.
- Repeat these steps until a reliable measurement is obtained. The pH meter will then indicate a value by measuring the pH7 solution. Again repeat the same for pH4 buffer solution.
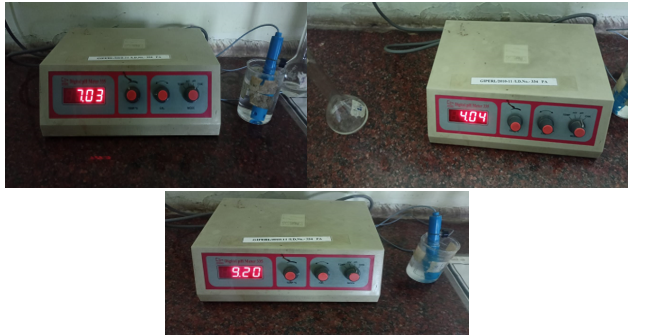
Fig 1.1 PH Meter with specific buffers
CONCLUSION:
The calibration procedures outlined for laboratory equipment, including volumetric flasks, measuring cylinders, graduated pipettes, and pH meters, are paramount for ensuring the accuracy and reliability of scientific measurements. By meticulously following these protocols, laboratories can uphold the quality standards necessary for safety studies, quality assurance programs, and various scientific investigations. Regular calibration not only enhances the precision of measurements but also fosters data integrity and compliance with regulatory requirements. It is imperative for laboratories to prioritize calibration practices as an integral component of their quality management systems to uphold the credibility and validity of scientific research. Effective calibration contributes to the overall robustness and trustworthiness of experimental findings, thereby advancing knowledge and innovation across diverse scientific disciplines.
REFERENCE :
- Greco, E., & Reasoner, J. (2010, June). Student laboratory skills and knowledge improved through individual lab participation. In 2010 Annual Conference & Exposition (pp. 15-1117).
- Gupta, C., Shende, S., Rahila, M. P., & Gosewade, S. (2024). Calibration of Different Glasswares for Analytical Methods. In Analytical Methods for Milk and Milk Products (pp. 3-38). Apple Academic Press.
- Thompson, W. (1942). Apparatus for Precision Calibration of Pipets, Volumetric Flasks, and Burets. Industrial & Engineering Chemistry Analytical Edition, 14(3), 268-271.
- DR .A.V.KASTURE , DR.K.R MAHADIK , DR.S.G.WADODKAR,DR.H.N.MORE pharmaceutical analysis instrumental method vol 2 published by nirali publication,25th edition 2019 page 1.1
- D?zdar, H., Aydem?r, B., & Vatan, C. (2020). Investigation of Different Compression Apparatus Usage Effects in Calibration Process of Strain Cylinders. MAPAN, 35, 359-364.
- Mangukiya, K. K., & Panchal, M. (2016). Impact of calibration of pipette on quality control results. Int. J. Clin. Biochem. Res, 3(1), 28-30.
- Gandhi, K., Sharma, R., Gautam, P. B., Mann, B., Gandhi, K., Sharma, R., ... & Mann, B. (2020). Calibration and Standardization. Chemical Quality Assurance of Milk and Milk Products, 147-173.
- Gangfeng Ouyang,6 - Calibration,Editor(s): Janusz Pawliszyn,Handbook of Solid Phase Microextraction,Elsevier,2012,Pages 167-199
- Buckley, P. T. (2001). Preparation of Buffers. An Experiment for Quantitative Analysis Laboratory. Journal of Chemical Education, 78(10), 1384.
- Cheng, K. L., & Zhu, D. M. (2005). On calibration of pH meters. Sensors, 5(4), 209-219.
- Federman Neto, A., Borges, A. D. L., & Lavrador, M. A. S. (2006). A simple protocol for the routine calibration of pH meters. Rev. ciênc. farm. básica apl, 63-72.
- NETO, A. F., Borges, A. D. L., & Lavrador, M. A. S. (2006). A simple protocol for the routine calibration of pH meters. Revista de Ciências Farmacêuticas Básica e Aplicada, 27(1).
- Akyar, I. (2011). GLP: Good laboratory practice. Modern Approaches To Quality Control, 37-56
- Practical Pharmaceutical Analysis by Dr. Arti R. Thakkar Mr. Nitin Sharma, paging publishers, first edition 2018, Pg. No. 5-9
- Lawn, R. E., Prichard, F. E., & Lawn, R. (2003). Measurement of Volume. Royal Society of Chemistry.
- Ouyang, G. (2012). Calibration. In Handbook of solid phase microextraction (pp. 167-199). Elsevier


 Vikas C. Mali* 1
 Asmita G. Lonare
 Namrta V. Thigale


 10.5281/zenodo.10980432